This post goes into the details of what goes on behind the scenes when a cluster is brought up, for example using helm or the local installation guide. This can be used both as a learning tool and troubleshooting guide. We assume that you have downloaded and installed all the necessary binaries before proceeding further.
Vitess is a very flexible system that is capable of running in a variety of environments. The local example does oversimplify things a bit. However, you will need to take more things into consideration when taking Vitess into production.
It will also be important to know how the various components interact with each other. This knowledge will facilitate troubleshooting if a cluster does not come up as intended.
Choosing a Topology Server #
The first component one needs to bring up is actually not a Vitess component. The toposerver can be ZooKeper, etcd, consul, or Kubernetes. Vitess needs a topo server to be up and running. The steps needed to bring up every kind of toposerver are not covered here.
Once you bring up the TopoServer, make sure that you can connect to it using one of their clients.
Choosing a Topo root #
You will probably need to run multiple independent Vitess clusters. For example, you may want to separate out the testing and staging clusters from the production one. However, you may still want to reuse the same TopoServer for all of these.
For this reason, Vitess allows you to choose a root directory in the Topo for each cluster. This directory is known as the topo_global_root and will need to be provided for every Vitess binary that is launched.
Caveat: In the case of ZooKeeper, you will actually need to create this directory in the server.
In the local example, we have chosen this to be /vitess/global. Here is a sample command to bring up etcd:
ETCD_SERVER="localhost:2379" etcd \
  --enable-v2=true \
  --data-dir="${VTDATAROOT}/etcd/" \
  --listen-client-urls="http://${ETCD_SERVER}" \
  --advertise-client-urls="http://${ETCD_SERVER}"
Configuring vtctld #
The most important flags for vtctld are the parameters needed to connect to the TopoServer and -topo_global_root. Here is a sample vtctld invocation:
vtctld \
  -topo_implementation=etcd2 \
  -topo_global_server_address=localhost:2379 \
  -topo_global_root=/vitess/global \
  -port=15000 \
  -grpc_port=15999 \
  -service_map='grpc-vtctl'
If the TopoServer is unreachable, or if the topo_global_root is not specified, vtctld will fail to start. You should see the following error message in the logs:
F0426 11:11:40.363545 14833 server.go:223] Failed to open topo server (etcd2,localhost:2379,/vitess/global): dial tcp 127.0.0.1:2379: connect: connection refused
Other required parameters to vtctld are port, grpc_port and service_map 'grpc-vtctl'.
The service_map flag allows you to configure the grpc APIs that a Vitess server exposes as gRPC. If grpc-vtctl is not specified as a service_map for vtctld, you will not be able to access it using vtctlclient.
Creating a cell #
The next step is to create a cell. This can be done by issuing the following command:
vtctlclient AddCellInfo -root=/vitess/zone1 -server_address=<address> zone1
NOTE: vtctlclient does not need a topo global root, because it only talks to vtctld, and vtctld already has that value.
The ‘-root’ flag is different from topo_global_root. All information specific to the cell will be stored under /vitess/zone1. The metadata about the cell (the fact that zone1 data is in /vitess/zone1) is stored in the global topo. Vitess binaries fetch this information from the global topo before switching to use the cell topo.
For higher fault tolerance, you can set up and specify a different TopoServer to serve the local cell. If isolation of failure zones is not important, you could just reuse the main TopoServer as long as you ensure that the root paths don’t conflict.
For the best fault tolerance, you'll need to setup the global topo server such that its nodes are distributed across multiple zones. The nodes of the local topo server should be within the cell itself.
The last parameter “zone1” is the name of the cell, which is required by the subsequent tools.
You can verify this information by browsing the Topology in vtctld:
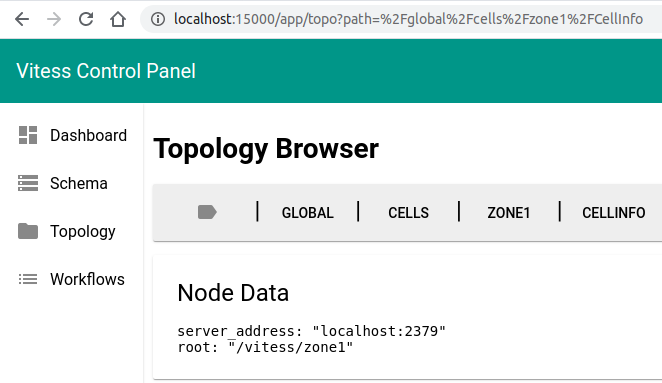
Note: In the local example, we’re using the vtctl tool to create the local cell. This is because we are creating the local cell before bringing up vtctld. However, this is not necessary. You can create the local cell after bringing up vtctld.
At this point, we have officially created an empty Vitess cluster.
Configuring VTGate #
Although the local example brings up vtgate last, this is not necessary. You can bring up vtgate before creating any keyspaces or bringing up vttablets. VTGate will discover them as they are brought up.
In addition to the topo parameters, vtgate requires a cell to operate in. A vtgate’s main job is to forward requests to the vttablets in the local cell. However, vtgates can go cross-cell in two situations:
- vtgate receives queries to the master, and the master is not in the current cell.
- vtgate was configured to go to other cells in case no local vttablets were available.
For sending master queries across cells, you must specify an additional cells_to_watch flag. This will make the vtgates watch those additional cells, and will help them keep track of the masters in those cells.
The cells_to_watch flag is a required parameter and must at least include the current cell. This is an issue we’ll fix soon: https://github.com/vitessio/vitess/issues/6126.
Going cross-cell for non-master requests is an advanced use case that requires setting up cell aliases, which will not be covered here.
The port flag is mandatory for vtgate.
For those who wish to use the Java or Go grpc clients to vtgate, you must also configure grpc_port and specify the service map as service_map='grpc-vtgateservice'.
For those who wish to use the mysql protocol, you must specify a mysql_server_port and a mysql_auth_server_impl for configuring authentication.
Here is a sample vtgate invocation:
vtgate \
  -topo_implementation=etcd2 \
  -topo_global_server_address=localhost:2379 \
  -topo_global_root=/vitess/global \
  -cell=zone1 \
  -cells_to_watch=zone1 \
  -port=15001 \
  -grpc_port=15991 \
  -service_map='grpc-vtgateservice' \
  -mysql_server_port=$mysql_server_port \
  -mysql_auth_server_impl=none
The reason why the local example brings up vtgate last is because vtgate polls the TopoServer for changes. Bringing it up last allows vtgate to find all the vttablets that were brought up, and immediately ready itself to send requests to them. This polling frequency is controlled by the tablet_refresh_interval whose default value is one minute. This means that it may take up to one minute for vtgate to discover a new vttablet that has come up. This interval can be lowered. However, one must be careful to ensure that too many vtgates don’t overwhelm the TopoServer.
VTGate uses the global topo to get the topo addresses of the cells it has to watch. For this reason, you do not need to specify the topo addresses for the individual cells.
VTGate does not communicate with vtctld.
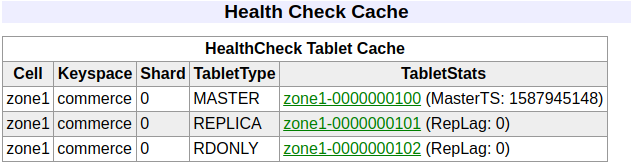
A vtgate that comes up successfully will show all the vttablets it has discovered in its /debug/status page under the Health Check Cache section.
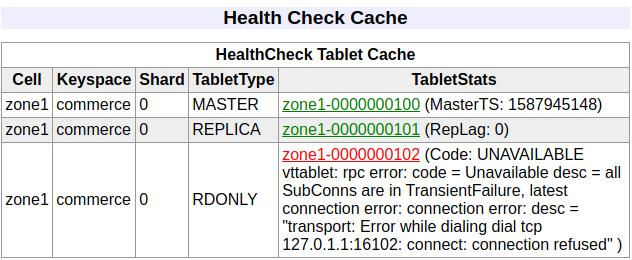
If vtgates cannot connect one of the vttablets it discovered to from the topo, or if the vttablet is unhealthy, it will be shown in red in the Health Check Cache, and a corresponding error message will be displayed next to it:
Understanding Keyspaces and Shards #
You can create keyspaces and shards using vtctlclient commands. However, they are not necessary because these are implicitly created as you bring up the vttablets.
It’s important to be aware of the relationship between the global topo and the cell-specific topo. The canonical information for keyspaces and shards is created in the global topo. This information is then pushed to the cell-specific topos through rebuild commands like RebuildKeyspaceGraph and RebuildVSchemaGraph. These commands are implicitly issued on your behalf whenever applicable. But there are situations where you’ll have to issue them manually. For example, if you create a new cell, you’ll have to issue these commands to copy the data into the new cell.
There are use cases where you may want to experimentally deploy changes to only some cells. Separating information from the global topo and local cells makes those experiments possible without affecting the entire deployment.
Tools like vtgate and vttablet consume information from the local copy of the topo.
An unsharded keyspace typically has a single shard named 0 or -. A sharded keyspace has shards named after the keyranges assigned to it, like -80 and 80-. The following section describes the process of bringing up vttablets for a single shard.
Configuring VTTablets #
For the sake of durability, we generally recommend that you bring up a quorum of vttablets coupled with their MySQL instances. It’s recommended that you bring up at least three vttablets, with semi-sync replication enabled. To bring up each node, perform the following steps:
1. Starting MySQL #
In order to bring up mysql, you may use the mysqlctl convenience wrapper. This tool is capable of bringing up multiple isolated mysql instances within a single machine, and preconfiguring them for easy connectivity from a vttablet.
The necessary arguments to a mysqlctl are the tablet_uid and mysql_port. This tablet UID should be supplied as tablet-path when invoking vttablet. Here’s a sample invocation:
mysqlctl -tablet_uid zone1-100 -mysql_port 17100 init
There is a common pitfall to watch out for: If you see an error like this in the mysqlctl logs, you may need to disable AppArmor:
I0429 01:16:25.648506       1 mysqld.go:454] Waiting for mysqld socket file (/vtdataroot/tabletdata/mysql.sock) to be ready...
I0429 01:16:25.656153       1 mysqld.go:399] Mysqld.Start(1588122985) stderr: mysqld: [ERROR] Could not open required defaults file: /vtdataroot/tabletdata/my.cnf
I0429 01:16:25.656180       1 mysqld.go:399] Mysqld.Start(1588122985) stderr: mysqld: [ERROR] Fatal error in defaults handling. Program aborted!
I0429 01:16:25.657249       1 mysqld.go:418] Mysqld.Start(1588122985) exit: exit status 1
Note that disabling AppArmor once may not be enoug. Many software installs or upgrades automatically install it back. You may have to disable it again if this happens.
Ensure that MySQL came up successfully. Because the full initialization of MySQL will be done after the vttablets come up, expect to see errors like these in the log file:
2020-04-27T00:38:02.040081Z 2 [Note] Aborted connection 2 to db: 'unconnected' user: 'root' host: 'localhost' (Got an error reading communication packets)
The MySQL instance that was brought up has no identity related to keyspace or shard at this moment. These will be assigned in the following steps.
Starting VTTablets #
VTTablet needs the topo and cell flags. Additionally, it needs the following flags:
tablet-path: This should be the same as thetablet-uidthat was supplied to the mysqlctl command.init_keyspace: The keyspace that the tablet is going to serve. This will cause a keyspace to be created if one is not present.init_shard: The shard that the tablet is going to serve. This will cause a shard to be created if one is not present.init_tablet_type: This will typically beREPLICA. You may use other tablet types like “RDONLY”. Those tablet types will be deprecated in favor of newer ways to achieve their functionality. Note that you are not allowed to start a tablet as aMASTER.enable_semi_sync: The recommended value for this isTRUE. You will need to bring up at least three vttablets for this setting to work correctly.port,grpc_port, and-service_map 'grpc-queryservice,grpc-tabletmanager’
You will typically need additional parameters for setting up backups and automatic restores, which we’ll not cover here. Here is a typical example:
vttablet \
  -topo_implementation=etcd2 \
  -topo_global_server_address=localhost:2379 \
  -topo_global_root=/vitess/global \
  -cell=zone1 \
  -tablet-path=zone1-100 \
  -init_keyspace=commerce \
  -init_shard=0 \
  -init_tablet_type=replica \
  -enable_semi_sync=true \
  -port=15100 \
  -grpc_port=16100 \
  -service_map 'grpc-queryservice,grpc-tabletmanager’
Bringing up the first vttablet will cause the keyspace and shard to be created in the global topo. Also, this action will cause a topology rebuild that will ensure that this information is propagated to the current cell.
Additionally, the vttablet will create a “tablet record” in the cell’s topo, which will be observed by the vtgates. The vtgate will then make a connection to the vttablet and will establish a health check stream. This is what causes the tablet to show up in vtgates Health Check Cache section.
However, visiting the vtgate page at this time will show all these tablets as unhealthy:
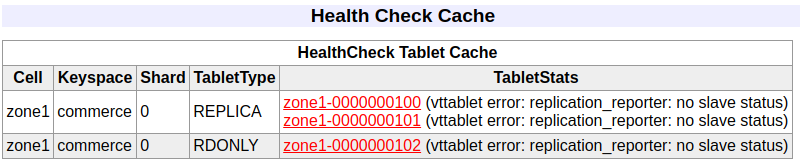
One final step is needed to get them started.
Starting InitShardMaster #
The InitShardMaster step initializes the quorum by electing a master and setting up replication for the replicas. Additionally, a database is created to store the data for the keyspace-shard. The command is as follows:
vtctlclient InitShardMaster -force commerce/0 zone1-100
NOTE: If you have semi-sync enabled and did not set up at least three replicas, InitiShardMaster could hang indefinitely. Even if it succeeds, future operations that perform failovers could cause this shard to go into a deadlocked state. The local example sets up only two replicas mainly to minimize resource usage.
After this step, visiting the /debug/status page on vtgate should show these tablets as green.
Congratulations! You have successfully brought up a Vitess cluster.
What’s next #
The above steps explain in detail the “101” step of the example. Following this, you will need to upload a schema and a VSchema. This will be covered in a different user guide.